Introduction
Imagine a dessert that’s unbelievably decadent, brimming with the classic combination of chocolate and peanut butter, yet requires minimal effort. Sounds like a dream, right? Well, prepare to meet your new go-to for instant gratification: the Peanut Butter Cup Dump Cake! This isn’t just a recipe; it’s a culinary revelation for the ultimate lazy baker, proving that you don’t need hours in the kitchen or fancy techniques to create something truly spectacular. It’s the perfect solution for those moments when a serious sweet craving strikes, or when you need a crowd-pleasing treat without the fuss.
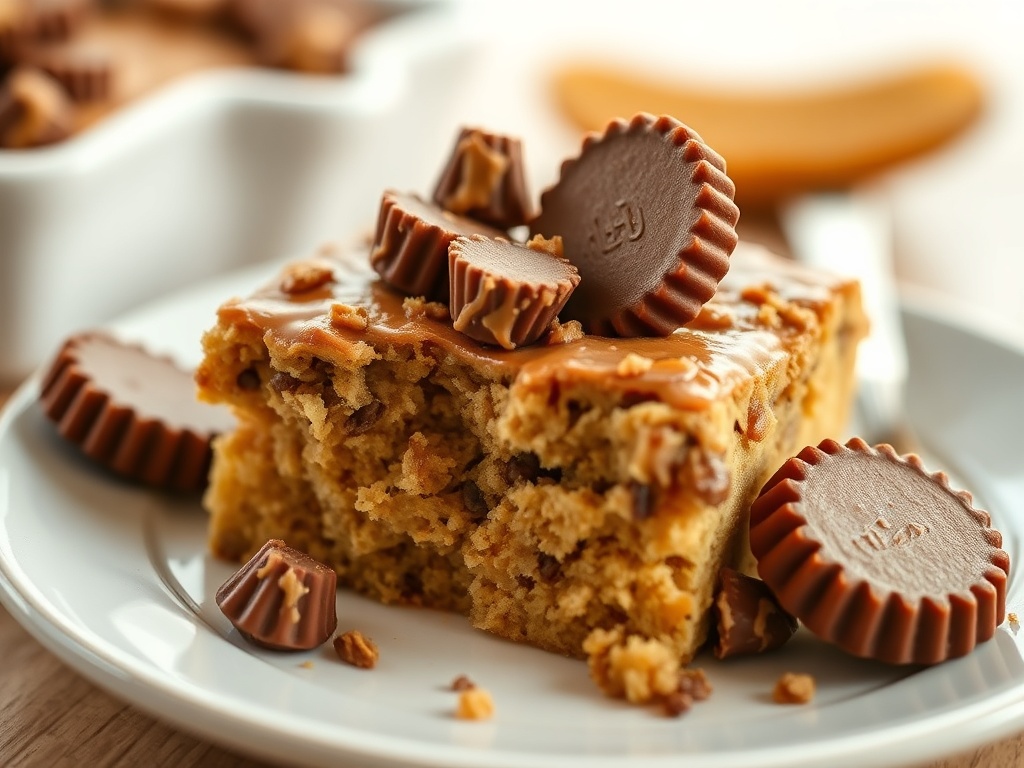
At its heart, the Peanut Butter Cup Dump Cake embodies the very essence of easy dessert making. We’re talking about a dish where the main “cooking” involves simply opening packages and layering ingredients into a pan. The magic happens in the oven, transforming a handful of pantry staples into a warm, gooey, fudgy masterpiece studded with melted peanut butter cups. This no-fuss baking approach means less time stressing and more time enjoying the irresistible blend of tender cake texture, rich chocolate, and creamy peanut butter that defines this indulgent creation.
Nutritional Information
Per serving (approximate values):
- Calories: 480
- Protein: 7g
- Carbohydrates: 60g
- Fat: 25g
- Fiber: 2g
- Sodium: 420mg
Ingredients
- 1 (15.25 ounce) box yellow cake mix (or chocolate cake mix for a deeper chocolate flavor)
- 1 ½ cups mini peanut butter cups (or 1 ½ cups chopped regular-sized peanut butter cups)
- 1 cup (2 sticks) unsalted butter, melted
- 1 cup whole milk (or 1 cup water, but milk adds richness)
- ½ cup creamy peanut butter, melted (optional, for drizzling/swirling)
- ½ cup chocolate chips (optional, for extra chocolatey goodness)
Instructions
- Preheat your oven to 350°F (175°C). Lightly grease a 9×13 inch baking dish with butter or cooking spray.
- Evenly “dump” or spread the dry cake mix across the bottom of the prepared baking dish. Do not mix with any liquids yet.
- Scatter the mini peanut butter cups (or chopped regular peanut butter cups) evenly over the dry cake mix layer.
- Drizzle the melted butter evenly over the peanut butter cups and cake mix. Ensure as much of the dry mix as possible gets covered by the butter.
- Carefully pour the whole milk (or water) evenly over the entire surface of the cake. Again, try to distribute it as broadly as possible without stirring.
- If you’re opting for the extra peanut butter swirl, gently drizzle the melted creamy peanut butter over the top of the cake. You can use a knife or skewer to create light swirls if desired, but be careful not to mix the dry cake mix into the liquid layers too much.
- If using chocolate chips, sprinkle them evenly over the top of the cake.
- Bake for 45-55 minutes, or until the top is golden brown, the edges are bubbly, and the cake is set. A toothpick inserted into the cake part (avoiding a melted peanut butter cup) should come out mostly clean.
- Remove from the oven and let the cake cool slightly for at least 15-20 minutes before serving. This allows the gooey center to set up a bit, making it easier to scoop.
Cooking Tips and Variations
The beauty of a dump cake lies in its simplicity, but a few key tips can elevate your Peanut Butter Cup Dump Cake from great to absolutely legendary. First and foremost, resist the urge to stir! This is the golden rule of dump cakes. The distinct, cobbler-like texture with a moist, fudgy bottom and a slightly crisp, cakey top is achieved by allowing the melted butter and milk (or water) to seep through the dry cake mix during baking. Stirring will result in a more traditional cake batter, which defeats the purpose of this unique dessert.
For optimal results, ensure even distribution of your dry ingredients and liquids. When spreading the cake mix, try to get an even layer across the bottom of the pan. Similarly, when drizzling the melted butter and pouring the milk, aim for broad coverage. This helps ensure that all the dry cake mix has enough moisture to transform into delicious cake. The choice of cake mix can significantly alter the flavor profile; while yellow cake mix provides a classic, buttery base, a chocolate or devil’s food cake mix will create an even more intense chocolate experience, perfect for true chocoholics. Don’t be shy with the peanut butter cups – feel free to adjust the amount based on your preference, and remember that mini cups melt into delightful pockets throughout, while chopped regular cups offer larger, more substantial bites of peanut butter goodness.
When it comes to moisture, using whole milk instead of water is a small but impactful change that will yield a richer, more tender, and moister cake. The fat content in the milk contributes to a more luxurious texture. And don’t forget the serving suggestions! This warm, gooey cake is absolutely divine on its own, but it truly shines when paired with a scoop of creamy vanilla ice cream, a dollop of freshly whipped cream, or an extra drizzle of chocolate syrup. For a textural contrast, a sprinkle of chopped roasted peanuts or a few Reese’s Pieces candy on top after baking can add a delightful crunch.
Feeling adventurous? The dump cake concept is incredibly versatile. For a nutty crunch variation, mix in a handful of chopped peanuts or almonds with your peanut butter cups. To go all-in on chocolate, use a chocolate cake mix, add extra chocolate chips (milk chocolate, dark chocolate, or even white chocolate), and consider a chocolate syrup drizzle after baking. The optional melted peanut butter swirl before baking adds another layer of rich peanut butter flavor and a beautiful marbled effect. And if you’re a fan of other candy bars, feel free to experiment! Chopped Snickers, Butterfingers, or even M&M’s could make for exciting and equally easy variations, proving that this recipe is truly a blank canvas for your sweet cravings.
Storage and Reheating
To store any leftover Peanut Butter Cup Dump Cake, allow it to cool completely to room temperature. Once cooled, cover the baking dish tightly with plastic wrap or aluminum foil. You can also transfer individual servings to airtight containers. The cake will stay fresh at room temperature for up to 2-3 days. If you want to extend its freshness, store it in the refrigerator for up to 5 days. Chilling the cake can make it a bit firmer, especially the gooey center.
When it comes to reheating, you have a few options depending on your preference. For individual servings, the microwave is your best friend. Place a slice on a microwave-safe plate and heat for 20-30 seconds, or until warmed through and gooey. Be careful not to overheat, as this can dry out the cake. For larger portions or if you prefer a crispier top, you can reheat the entire dish or a few slices in a preheated oven. Cover the dish loosely with foil to prevent excessive browning and bake at 300°F (150°C) for about 10-15 minutes, or until warmed through. This method helps maintain the cake’s original texture better than the microwave.
Frequently Asked Questions
Can I use sugar-free cake mix or peanut butter cups?
While you can certainly experiment with sugar-free alternatives for the cake mix and peanut butter cups, the final texture and flavor profile may differ from the original recipe. Sugar plays a crucial role in both the sweetness and the structural integrity of baked goods. Sugar-free cake mixes can sometimes result in a slightly drier cake, and sugar-free peanut butter cups might not melt and become as gooey as their regular counterparts. If you do use them, be prepared for a potentially different outcome.
My dump cake didn’t set properly in the middle. What went wrong?
If your dump cake is too gooey or hasn’t fully set in the middle, it’s likely due to insufficient baking time or your oven temperature being slightly off. Ovens can vary, so it’s always a good idea to trust your instincts and the visual cues. Ensure the cake is golden brown on top and bubbly around the edges, and that a toothpick inserted into the cake (not a melted peanut butter cup) comes out mostly clean. If it’s still too wet, simply pop it back into the oven for another 5-10 minutes. Also, avoid opening the oven door too frequently during baking, as this can cause temperature fluctuations.
Can I prepare this dump cake ahead of time?
Yes, you can definitely prepare the Peanut Butter Cup Dump Cake ahead of time. While it’s absolutely divine served warm and fresh from the oven, it also holds up beautifully at room temperature for a day or two, or refrigerated for up to 5 days. For best results, allow it to cool completely before covering and storing. If you plan to serve it for an event, baking it the day before is perfectly acceptable. Just give it a quick warm-up in the microwave or oven before serving to bring back its gooey goodness.
What’s the best way to serve this dump cake?
The best way to serve this decadent dump cake is warm, allowing the peanut butter cups to remain delightfully melted and gooey. It’s fantastic on its own, but to truly elevate the experience, pair it with a scoop of cold vanilla bean ice cream. The contrast between the warm, rich cake and the cool, creamy ice cream is simply heavenly. A dollop of fresh whipped cream, a drizzle of chocolate sauce, or even a sprinkle of chopped peanuts for added crunch are also excellent accompaniments that enhance the overall indulgence of this easy treat.