Introduction
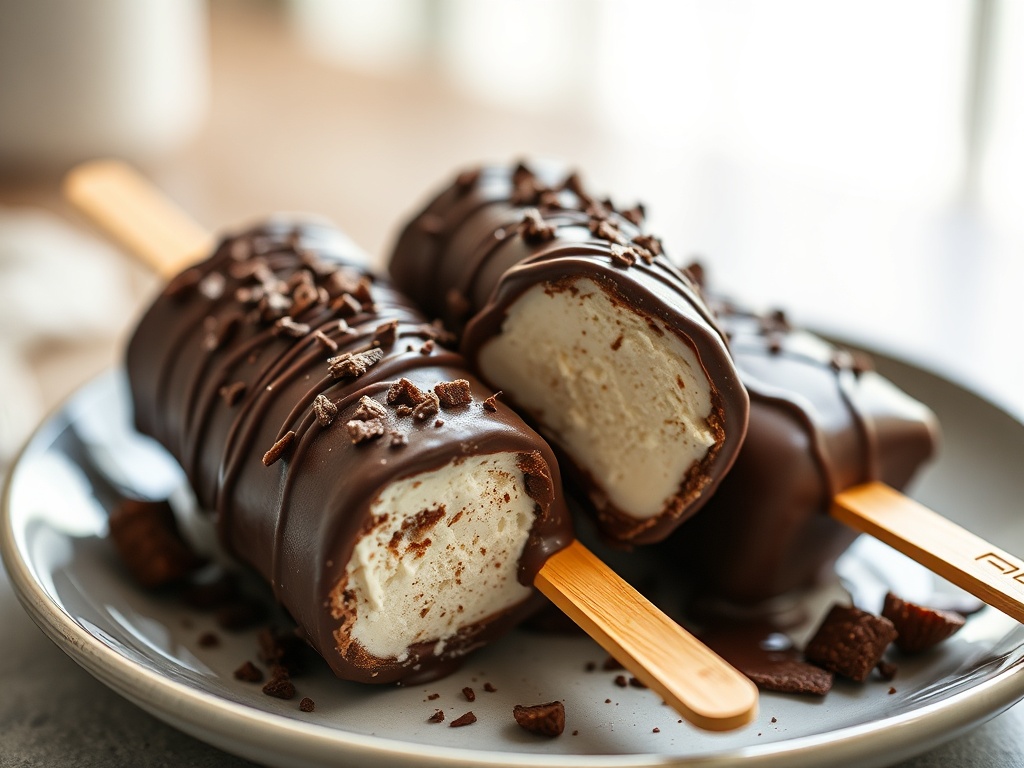
Imagine this: the satisfying crack of a rich chocolate shell, giving way to a creamy, luscious ice cream interior. A burst of cool sweetness followed by the decadent bitterness of dark chocolate, all in one perfect bite. There’s nothing quite like a chocolate-covered ice cream bar, and while the store-bought versions are good, making them at home elevates this classic treat to an entirely new level of deliciousness and satisfaction.
Homemade chocolate-covered ice cream bars aren’t just a dessert; they’re an experience. They offer the joy of customization, allowing you to choose your favorite ice cream flavors, experiment with different chocolate types, and go wild with toppings. Beyond the endless flavor possibilities, crafting these frozen delights in your own kitchen ensures you’re using quality ingredients, often at a fraction of the cost of gourmet store-bought options. It’s a fun activity that brings smiles, creates delicious memories, and taps into a delightful sense of nostalgia for simpler times.
This recipe is designed to be approachable, guiding you through each step to create impressive, delectable ice cream bars that will wow your family and friends. Whether you’re a seasoned baker or a kitchen novice, you’ll find this process rewarding and the results utterly irresistible. So, get ready to unleash your inner confectioner and dive into the delightful world of homemade chocolate-covered ice cream bars!
Nutritional Information
Per serving (approximate values, based on vanilla ice cream and dark chocolate coating with coconut oil, without additional toppings):
- Calories: 350-450
- Protein: 4-6g
- Carbohydrates: 30-40g
- Fat: 25-35g
- Fiber: 2-4g
- Sodium: 50-80mg
Ingredients
For the Ice Cream Bars (Choose one option):
Option 1: Store-Bought Ice Cream
- 1.5 quarts (approx. 1.4 liters) high-quality ice cream (vanilla, chocolate, mint chip, or your favorite)
Option 2: Simple No-Churn Ice Cream (for 8-10 bars)
- 2 cups (480ml) heavy whipping cream, very cold
- 1 (14-ounce/397g) can sweetened condensed milk, chilled
- 1 teaspoon pure vanilla extract (optional, or other flavorings)
For the Chocolate Coating:
- 10-12 ounces (280-340g) good quality dark chocolate (60-70% cacao), chopped or baking chocolate bars
- 2-3 tablespoons refined coconut oil (or vegetable oil)
- Pinch of flaky sea salt (optional, for sprinkling)
Optional Toppings:
- 1/2 cup chopped nuts (almonds, peanuts, pecans)
- 1/4 cup sprinkles
- 1/2 cup crushed cookies (Oreos, graham crackers)
- 1/4 cup mini chocolate chips
Equipment:
- Silicone ice cream bar molds (yields 8-10 bars, depending on mold size)
- Wooden popsicle sticks (8-10)
- Baking sheet lined with parchment paper or a silicone mat
- Tall, narrow glass or container (for dipping)
- Double boiler setup (or microwave-safe bowl)
- Spatula or whisk
Instructions
- Prepare the Ice Cream Bars:
- If using store-bought ice cream: Remove the ice cream from the freezer and let it soften at room temperature for 10-15 minutes, or until it’s pliable enough to scoop and press, but not melted.
- Using a spoon or small spatula, firmly press the softened ice cream into each cavity of your silicone molds. Ensure there are no air pockets and the top is relatively flat.
- Insert a wooden popsicle stick into the base of each ice cream-filled mold, pushing it about halfway into the ice cream.
- Place the filled molds on a baking sheet and transfer them to the freezer. Freeze for a minimum of 4-6 hours, but preferably overnight, until the ice cream is absolutely rock solid. This is crucial for successful dipping.
- If making no-churn ice cream: In a large, very cold bowl, whip the cold heavy cream with an electric mixer on high speed until stiff peaks form.
- In a separate bowl, stir together the chilled sweetened condensed milk and vanilla extract (if using).
- Gently fold the condensed milk mixture into the whipped cream until just combined, being careful not to deflate the cream.
- Pour the no-churn ice cream mixture into your silicone molds, filling each cavity. Insert the popsicle sticks.
- Freeze as directed above, for at least 6-8 hours, or overnight, until completely firm.
- Prepare Your Dipping Station:
- Before you start melting chocolate, get all your toppings ready. If using chopped nuts, sprinkles, or crushed cookies, place them in shallow dishes or bowls.
- Line a clean baking sheet with parchment paper or a silicone mat. This will be where you place the dipped bars.
- Melt the Chocolate Coating:
- Chop the dark chocolate into small, uniform pieces if using a bar. This helps it melt more evenly.
- Double Boiler Method: Fill a saucepan with about an inch or two of water and bring it to a gentle simmer. Place a heatproof bowl (make sure it fits snugly over the saucepan without touching the water) over the simmering water. Add the chopped chocolate to the bowl. Stir occasionally with a spatula until the chocolate is completely melted and smooth. Remove from heat.
- Microwave Method: Place the chopped chocolate in a microwave-safe bowl. Microwave on 50% power in 30-second intervals, stirring well after each interval, until the chocolate is mostly melted. Remove from the microwave and continue stirring until completely smooth. Be careful not to overheat.
- Once the chocolate is melted and smooth, stir in 2 tablespoons of refined coconut oil until fully incorporated. The oil will thin the chocolate, making it easier to dip and creating that signature snappy shell. If the chocolate still seems too thick for dipping, add the third tablespoon of coconut oil, one teaspoon at a time, until the desired consistency is reached.
- Pour the melted chocolate into a tall, narrow glass or container. This allows for a deeper dip with less chocolate, making the process more efficient.
- Allow the chocolate to cool slightly for 5-10 minutes. It should still be liquid but not hot. *Key Fact:* Too hot, and it will melt the ice cream; too cool, and it will be too thick.
- Dip and Decorate the Ice Cream Bars:
- Working quickly, remove the frozen ice cream bars from the freezer, one or two at a time, and gently unmold them from the silicone molds.
- Hold an ice cream bar by its stick and swiftly plunge it completely into the melted chocolate, ensuring it’s fully coated.
- Immediately lift the bar out of the chocolate and let any excess chocolate drip off back into the glass. You can gently tap the stick against the rim of the glass to encourage dripping.
- If adding toppings, sprinkle them generously onto the chocolate-coated bar immediately after dipping, before the chocolate has a chance to set. The chocolate will harden very quickly on the cold ice cream.
- Place the coated and decorated ice cream bar onto the parchment-lined baking sheet.
- Repeat with the remaining ice cream bars. If the chocolate in your dipping vessel starts to thicken too much, you can gently warm it again for a few seconds in the microwave or over the double boiler to restore its fluidity.
- Final Freeze:
- Once all the bars are dipped and decorated, immediately return the baking sheet with the bars to the freezer.
- Freeze for at least 15-30 minutes, or until the chocolate shell is completely set and firm.
- Serve and Enjoy!
Cooking Tips and Variations
The success of your homemade chocolate-covered ice cream bars hinges on a few crucial details. First and foremost, the ice cream must be absolutely rock solid before dipping. If it’s even slightly soft, it will melt too quickly when it hits the chocolate, leading to a messy, uneven coating and potentially a broken bar. Plan ahead and ensure your bars have ample time to freeze, preferably overnight. When preparing your chocolate coating, remember that coconut oil is your secret weapon. It lowers the viscosity of the chocolate, allowing it to coat thinly and set quickly with that satisfying “snap.” Refined coconut oil is recommended if you want a neutral flavor, while unrefined will impart a subtle coconut note. Always melt your chocolate gently, whether using a double boiler or short bursts in the microwave, to prevent burning and a grainy texture. Overheated chocolate can also “seize” and become unusable. Have your dipping station completely set up before you start: chocolate melted and slightly cooled, toppings ready in shallow dishes, and your parchment-lined baking sheet waiting. Work quickly once the bars are out of the freezer, as the chocolate sets almost instantly on contact with the cold ice cream.
This recipe is incredibly versatile, inviting endless experimentation. For the ice cream base, don’t limit yourself to vanilla. Try coffee, strawberry, peanut butter, or even a dairy-free option like coconut milk-based ice cream for those with dietary restrictions. The chocolate coating itself can be varied; use milk chocolate for a sweeter profile, white chocolate for a different aesthetic (perhaps dyed with food coloring for special occasions), or even flavored chocolates like orange or chili-infused varieties. Beyond the classic chopped nuts and sprinkles, consider other fun mix-ins and toppings. Crushed pretzels add a delightful salty crunch, while mini chocolate chips, toasted coconut flakes, or even a drizzle of caramel or white chocolate before the final freeze can elevate your bars further. For a sophisticated touch, a sprinkle of flaky sea salt on a dark chocolate coating is always a winner. If you’re feeling adventurous, you can even stir a tablespoon of finely chopped nuts or freeze-dried fruit powder directly into your melted chocolate for a flavored shell. For a nut-free option, crushed puffed rice cereal adds a great crunch without allergens.
Storage and Reheating
Homemade chocolate-covered ice cream bars are best enjoyed when the chocolate shell is perfectly crisp and the ice cream is creamy. To maintain this ideal texture, proper storage is key. Once the chocolate coating has completely set after its final freeze, transfer the bars to an airtight freezer-safe container. You can stack them, but it’s best to place a small piece of parchment paper between layers to prevent them from sticking together. Stored this way, the ice cream bars will remain fresh and delicious in the freezer for up to 2-3 weeks. Beyond that, while still safe to eat, the ice cream may start to develop freezer burn, and the texture of both the ice cream and the chocolate shell might degrade slightly. There’s no need for “reheating” these frozen treats! Simply remove them from the freezer a few minutes before serving to allow the ice cream to soften just enough to be creamy, but not so much that it melts. This brief resting period also allows the chocolate shell to come to a slightly less rigid temperature, making for a more pleasant bite. Avoid leaving them out at room temperature for too long, as the chocolate will melt and the ice cream will become soupy.
What kind of chocolate is best for the coating?
For the best results, use good quality baking chocolate bars or couverture chocolate with a cacao percentage between 60-70%. These chocolates melt smoothly and have a higher cocoa butter content, which contributes to a snappier, more stable shell. Avoid using standard chocolate chips, as they often contain stabilizers that make them less fluid when melted and can result in a thicker, less crisp coating.
Why did my chocolate coating crack?
Chocolate coating usually cracks for a few reasons. The most common is that the ice cream bar was not frozen solid enough when dipped, causing the chocolate to seize or cool too rapidly and unevenly. Another reason could be that the melted chocolate was too hot, which can also shock the chocolate when it hits the very cold ice cream. Ensure your ice cream is rock solid and your melted chocolate has cooled slightly to just above body temperature before dipping.
Can I make these dairy-free?
Absolutely! To make dairy-free chocolate-covered ice cream bars, simply use your favorite dairy-free ice cream (coconut milk, almond milk, or oat milk-based). For the chocolate coating, ensure you choose a high-quality dark chocolate that is certified dairy-free, as some dark chocolates can contain milk solids. The coconut oil in the coating recipe is naturally dairy-free and will work perfectly.
My chocolate is too thick/thin for dipping. What should I do?
If your chocolate is too thick after adding the initial coconut oil, add another teaspoon of refined coconut oil at a time, stirring well after each addition, until you reach the desired dipping consistency. If your chocolate is too thin, it might be too hot. Let it cool down for a few more minutes, stirring occasionally, until it thickens slightly. If it’s still too thin after cooling, you can try adding a small amount of additional chopped chocolate (not melted) and stir until it melts and thickens the mixture.