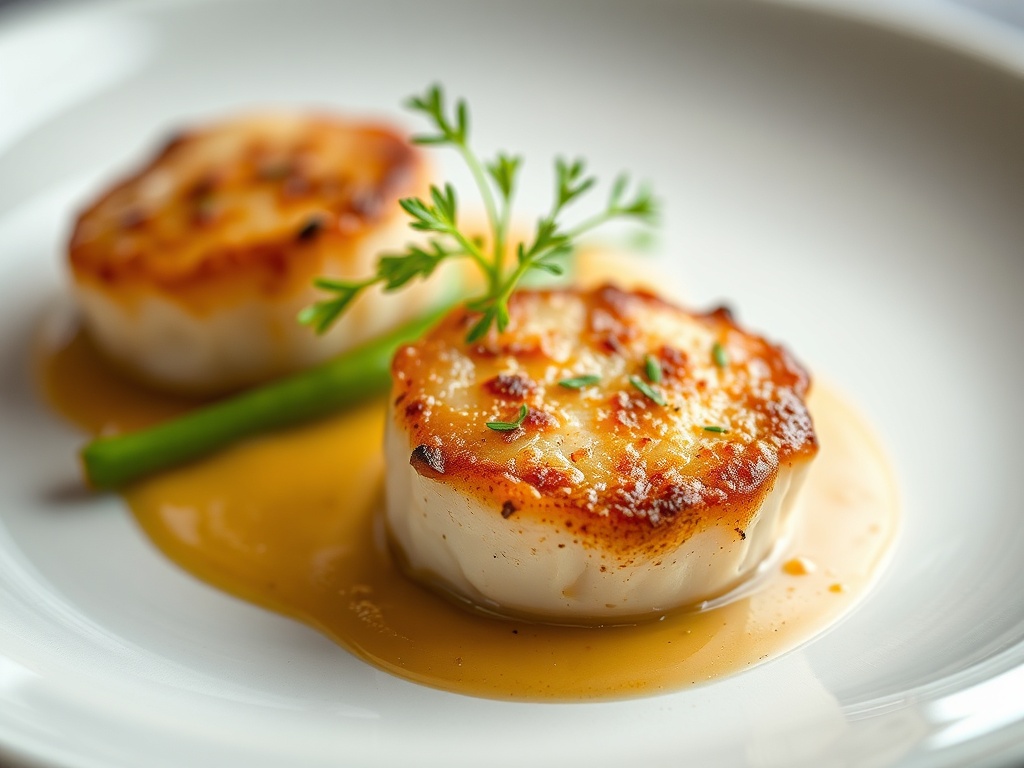
Ruth’s Chris Pan-Seared Sea Scallops
Introduction
Imagine a dish so exquisite, so perfectly crafted, that with every bite, you’re transported to a world of culinary delight. That’s precisely the experience offered by Ruth’s Chris Pan-Seared Sea Scallops. These aren’t just any scallops; they are succulent, perfectly caramelized, and melt-in-your-mouth tender, embodying the very essence of fine dining. Ruth’s Chris Steak House has long been synonymous with unparalleled quality and a commitment to flavor, and while their steaks are legendary, their seafood offerings like these scallops are equally impressive, showcasing the restaurant’s dedication to simple, high-quality ingredients prepared with precision.
The allure of Ruth’s Chris lies in its ability to elevate classic dishes to an art form. This recipe brings that very magic into your home kitchen, allowing you to recreate the restaurant experience without the reservation. Many believe that achieving such restaurant-quality scallops is a task best left to professional chefs, but we’re here to tell you that it’s far easier than you might think. With the right techniques and a focus on a few crucial details, you can master the art of the perfect sear and impress your family and friends with a dish that tastes like it came straight from a five-star kitchen.
What makes these scallops truly special is their elegant simplicity. There are no complex sauces or an extensive list of exotic ingredients. Instead, the dish celebrates the natural sweetness and delicate texture of premium sea scallops, enhanced by a flawless, golden-brown crust and a rich, buttery finish. It’s a testament to the idea that sometimes, the most extraordinary flavors come from the most straightforward preparations, allowing the star ingredient to truly shine.
Nutritional Information
Per serving (approximate values):
- Calories: 280
- Protein: 25g
- Carbohydrates: 3g
- Fat: 18g
- Fiber: 0g
- Sodium: 450mg
Ingredients
- 1 pound large, “dry” sea scallops (about 10-12 scallops)
- 2 tablespoons high-smoke point oil (grapeseed, avocado, or clarified butter)
- 2 tablespoons unsalted butter, cold and cut into 4 pieces
- ½ teaspoon Kosher salt, or to taste
- ¼ teaspoon freshly ground black pepper, or to taste
- Optional: 1 tablespoon fresh parsley or chives, finely chopped, for garnish
- Optional: Lemon wedges, for serving
Instructions
- Prepare the Scallops: Carefully remove the small, tough side muscle (adductor muscle) from each scallop, if present. This muscle is chewy and should be discarded.
- Pat Dry, Crucial Step: This is arguably the most important step for achieving a perfect sear. Lay the scallops in a single layer on a plate or baking sheet lined with several layers of paper towels. Place more paper towels on top and gently press to absorb as much moisture as possible. Repeat this process with fresh paper towels until the scallops are bone dry. Any residual moisture will steam the scallops instead of searing them, preventing that beautiful crust.
- Season the Scallops: Evenly sprinkle both sides of the dried scallops with Kosher salt and freshly ground black pepper. Do this just before cooking.
- Heat the Pan: Place a heavy-bottomed, oven-safe pan (cast iron or stainless steel is ideal) over high heat. Allow the pan to heat for 2-3 minutes until it is smoking lightly. A properly hot pan is essential for the Maillard reaction, which creates the desirable browned crust.
- Add Oil: Once the pan is hot, add the high-smoke point oil. Swirl the pan to evenly coat the bottom. The oil should shimmer, indicating it’s ready.
- Sear the Scallops (First Side): Carefully place the seasoned scallops into the hot pan in a single layer, ensuring they are not overcrowded. Leave at least ½ inch of space between each scallop. If necessary, sear in batches to avoid lowering the pan temperature. Do not touch or move the scallops for 2-3 minutes.
- Check for Crust and Flip: After 2-3 minutes, gently lift one scallop with tongs to check for a deep, golden-brown crust. If a beautiful crust has formed, flip all the scallops to the other side.
- Add Butter and Baste: Immediately after flipping, add the cold pieces of unsalted butter to the pan. The butter will melt quickly and begin to foam. Tilt the pan slightly and, using a spoon, baste the scallops with the melted butter and pan juices for the remaining cooking time.
- Finish Cooking: Continue to cook the scallops for another 1-2 minutes on the second side, basting continuously, until they are opaque throughout but still slightly translucent in the center. The total cooking time will depend on the size of the scallops, but generally, 4-5 minutes total is sufficient. Overcooking will result in tough, rubbery scallops.
- Rest and Serve: Remove the scallops from the pan and place them on a clean plate. Let them rest for 1-2 minutes. This brief resting period allows the juices to redistribute.
- Garnish and Enjoy: Garnish with fresh parsley or chives, if desired, and serve immediately with fresh lemon wedges on the side.
Cooking Tips and Variations
Achieving that perfect, restaurant-quality sear on your scallops hinges on a few crucial details. First and foremost, the scallops must be absolutely dry. We cannot overstate this. Any moisture on the surface will prevent the Maillard reaction from occurring, leading to steamed, rather than seared, scallops. Use multiple layers of paper towels and press firmly. Secondly, a screaming hot pan is non-negotiable. Don’t be afraid to let your cast iron or stainless steel pan get smoking hot before adding the oil. This intense heat is what creates that beautiful, crispy crust in a short amount of time.
Another common mistake is overcrowding the pan. Placing too many scallops in the pan at once will drastically lower the pan’s temperature, leading to a steamy environment and a lack of proper browning. Work in batches if necessary, ensuring each scallop has ample space to breathe and sear. The cooking time for scallops is incredibly short, typically 2-3 minutes per side. They go from perfectly tender to rubbery in a matter of seconds, so stay attentive and watch for visual cues: a deep golden crust and opaque sides with a hint of translucence in the very center.
For flavor enhancements, a simple squeeze of fresh lemon juice at the end brightens the dish and cuts through the richness of the butter. A sprinkle of fresh herbs like finely chopped parsley, chives, or tarragon adds an aromatic finish. If you’re feeling adventurous, consider making a quick pan sauce by deglazing the pan after removing the scallops. Add a splash of dry white wine or chicken broth, scrape up any browned bits from the bottom of the pan, and reduce slightly. Whisk in a knob of cold butter and a squeeze of lemon for an instant, elegant sauce. You could also infuse the butter with garlic or a sprig of thyme while basting for an extra layer of flavor. For an advanced touch, try a compound butter made with roasted garlic and herbs for the finishing baste.
Storage and Reheating
Pan-seared scallops are best enjoyed immediately after cooking for optimal texture and flavor. The delicate nature of scallops means they don’t hold up well to storage and reheating. The perfect tender, slightly bouncy texture quickly turns rubbery and dry when exposed to heat a second time.
If you do have leftovers, allow them to cool completely before transferring them to an airtight container. Store them in the refrigerator for no more than 1-2 days. While safe to eat, the quality will significantly diminish.
Reheating scallops is generally not recommended as it almost always results in an overcooked, rubbery texture. However, if you must, the gentlest method is to briefly warm them in a non-stick pan over very low heat with a tiny bit of butter or broth, just until they are heated through. Avoid high heat or microwave reheating, as these methods will guarantee a tough, unpleasant result. Consider repurposing leftover scallops by chopping them and adding them to a cold seafood salad or pasta, where their texture is less critical.
Frequently Asked Questions
What’s the difference between “wet” and “dry” scallops, and why is it important?
“Wet” scallops are treated with sodium tripolyphosphate (STP), a preservative that causes them to absorb water, making them appear larger and heavier. This added water makes it nearly impossible to achieve a good sear, as the water steams the scallops instead of allowing them to brown. “Dry” scallops, on the other hand, are untreated and retain their natural moisture content, making them ideal for searing and developing that coveted caramelized crust. Always ask your fishmonger for “dry-packed” sea scallops.
How can I tell if my scallops are perfectly cooked and not overcooked?
Perfectly cooked scallops will have a beautiful, deep golden-brown crust on both sides and be opaque throughout, with just a hint of translucence remaining in the very center. When gently pressed, they should feel firm but still yield slightly. Overcooked scallops will be completely opaque, firm, and rubbery when pressed, and will lack that tender, sweet flavor. The total cooking time is usually very short, often just 2-3 minutes per side, depending on their size.
Can I use olive oil for searing scallops?
While olive oil is a popular cooking oil, extra virgin olive oil has a relatively low smoke point, meaning it will burn and impart a bitter flavor at the high temperatures required for searing scallops. It’s best to use a high-smoke point oil like grapeseed oil, avocado oil, or clarified butter (ghee). These oils can withstand the intense heat needed to create a perfect crust without burning, ensuring your scallops taste clean and delicious. You can, however, use a drizzle of good quality extra virgin olive oil for finishing, after the scallops are cooked.