Introduction
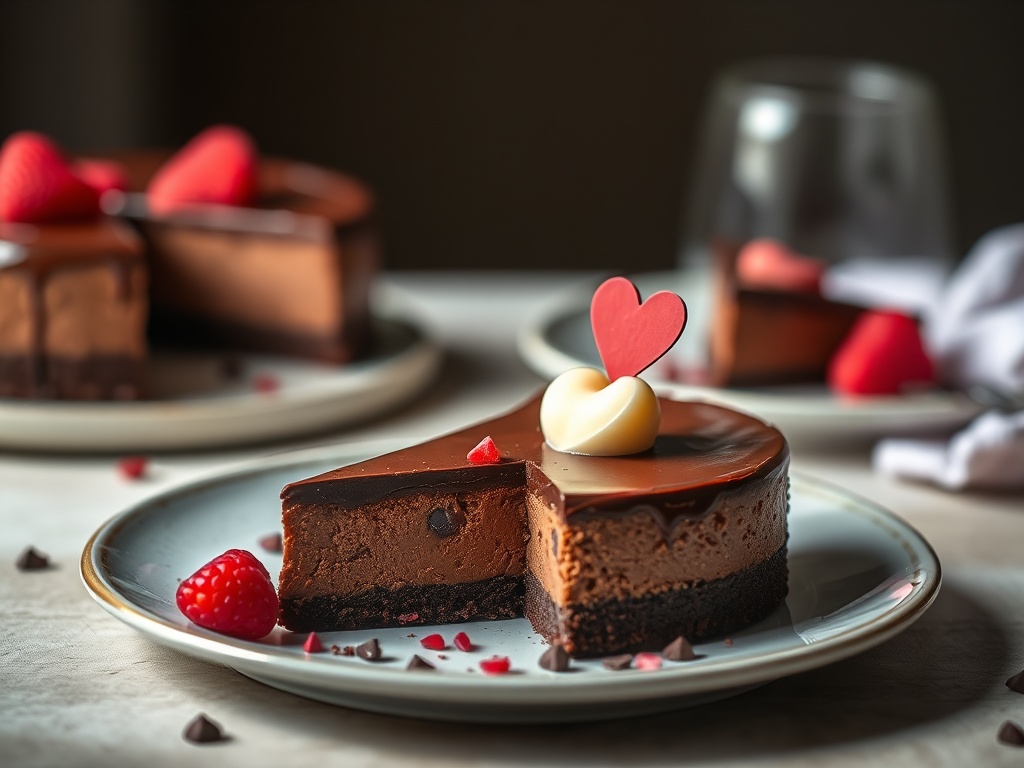
This Valentine’s Day, skip the crowded restaurants and store-bought treats. Instead, whisk your way into your sweetheart’s heart with a dessert that truly speaks volumes: a luscious Chocolate Valentine’s Day Cheesecake. Imagine the rich, velvety texture melting in your mouth, the deep chocolate flavor enveloping your senses, and the sheer joy of sharing a homemade masterpiece created with love. This isn’t just any cheesecake; it’s a decadent declaration of affection, a culinary Cupid’s arrow aimed straight for the heart.
What makes this chocolate cheesecake so special? It’s the perfect harmony of impressive elegance and achievable home baking. We’re talking about a dreamy, creamy filling infused with high-quality chocolate, nestled atop a crisp chocolate wafer crust, and crowned with an optional, but highly recommended, glossy chocolate ganache. While it boasts a sophisticated appearance that will surely dazzle, our detailed guide breaks down each step, ensuring even novice bakers can create a show-stopping dessert. This recipe isn’t just for Valentine’s Day; it’s versatile enough for anniversaries, special celebrations, or any moment you want to make extra sweet and memorable.
Chocolate holds a universally loved appeal, deeply intertwined with notions of romance and indulgence. Its complex flavors, from bitter to sweet, have long been associated with passion and pleasure, making it the quintessential ingredient for Valentine’s Day. Coupled with the timeless allure of cheesecake – a dessert celebrated for its rich, smooth texture and satisfying decadence – you have a combination that’s simply irresistible. Opting for homemade over store-bought allows you to infuse your dessert with personal care and attention, transforming a simple treat into a heartfelt gift. The satisfaction of presenting a dessert you’ve crafted yourself, knowing every ingredient that went into it, adds an invaluable layer of love that no pre-made option can replicate. So, prepare to embark on a delicious baking journey that promises to delight taste buds and warm hearts.
Nutritional Information
Per serving (approximate values):
- Calories: 550
- Protein: 8g
- Carbohydrates: 55g
- Fat: 35g
- Fiber: 3g
- Sodium: 250mg
Ingredients
-
For the Crust:
- 24 chocolate wafer cookies (Oreo-style, without cream filling), about 1 ½ cups crushed
- 6 tablespoons unsalted butter, melted
- 2 tablespoons granulated sugar (optional, for extra sweetness)
-
For the Cheesecake Filling:
- 32 ounces (4 blocks) full-fat cream cheese, softened to room temperature
- 1 ½ cups granulated sugar
- ½ cup unsweetened cocoa powder (high quality for best flavor)
- 4 large eggs, at room temperature
- ½ cup sour cream or full-fat Greek yogurt, at room temperature
- 2 teaspoons pure vanilla extract
- ¼ teaspoon salt
- 8 ounces semi-sweet or dark chocolate (good quality, 60-70% cacao), melted and cooled slightly
-
For the Ganache Topping (Optional but Recommended):
- ½ cup heavy cream
- 4 ounces semi-sweet or dark chocolate, finely chopped
- 1 tablespoon unsalted butter (optional, for extra shine)
Instructions
-
Prepare the Crust:
- Preheat your oven to 350°F (175°C).
- Lightly grease a 9-inch springform pan. If desired, line the bottom with a circle of parchment paper for easier removal.
- Crush the chocolate wafer cookies: Place the cookies in a food processor and pulse until fine crumbs form. Alternatively, place them in a Ziploc bag and crush with a rolling pin until fine.
- In a medium bowl, combine the crushed cookie crumbs, melted butter, and optional granulated sugar. Mix until the crumbs are evenly moistened and resemble wet sand.
- Press the mixture firmly and evenly into the bottom of the prepared springform pan. Use the back of a spoon or the bottom of a flat glass to compact the crust.
- Bake the crust for 8-10 minutes. This pre-baking step helps create a sturdier crust that won’t get soggy. Remove from oven and set aside to cool slightly while you prepare the filling. Reduce oven temperature to 325°F (160°C).
-
Prepare the Cheesecake Filling:
- In a large mixing bowl, using an electric mixer (stand mixer with paddle attachment or hand mixer), beat the softened cream cheese on medium speed until completely smooth and free of lumps. This can take 2-3 minutes. Ensure it’s truly lump-free, as lumps at this stage will remain in the final cheesecake.
- Add the granulated sugar and cocoa powder to the cream cheese. Beat on low speed until just combined, then increase to medium and beat until well incorporated and smooth, scraping down the sides of the bowl as needed.
- Melt the 8 ounces of semi-sweet or dark chocolate. You can do this in a microwave in 30-second intervals, stirring between each, or over a double boiler. Allow the melted chocolate to cool slightly (to lukewarm) before adding to the batter.
- Pour the slightly cooled melted chocolate into the cream cheese mixture. Beat on low speed until fully incorporated and the batter is uniformly chocolatey.
- Add the eggs one at a time, beating on low speed just until each egg is combined before adding the next. Be careful not to overmix at this stage, as overmixing incorporates too much air, which can lead to cracks in the cheesecake.
- Stir in the sour cream (or Greek yogurt), vanilla extract, and salt until just combined. The batter should be smooth and velvety.
-
Prepare for Water Bath and Bake:
- Prepare your springform pan for a water bath. Tear off two large sheets of heavy-duty aluminum foil and crisscross them. Place the springform pan in the center and tightly wrap the foil up and around the sides of the pan, ensuring there are no seams or gaps for water to seep in. Double-wrapping is recommended for extra security.
- Pour the cheesecake filling over the cooled crust in the foil-wrapped springform pan. Gently tap the pan on the counter a few times to release any trapped air bubbles and level the top.
- Place the foil-wrapped springform pan into a larger roasting pan.
- Carefully pour hot (not boiling) water into the roasting pan until it comes about halfway up the sides of the springform pan.
- Carefully transfer the roasting pan with the cheesecake to the preheated oven (325°F/160°C).
- Bake for 60-75 minutes, or until the edges are set and the center of the cheesecake still has a slight jiggle when gently shaken. An internal thermometer inserted into the center should read 150°F (65°C). Do not overbake, as this is a common cause of cracks.
-
Cooling and Chilling Revelation:
- Once baked, turn off the oven but leave the cheesecake inside with the oven door propped open slightly (using a wooden spoon) for 1 hour. This gradual cooling prevents temperature shock and helps prevent cracks.
- After 1 hour, carefully remove the roasting pan from the oven. Remove the springform pan from the water bath and unwrap the foil. Place the cheesecake on a wire rack to cool completely at room temperature for another 1-2 hours.
- Once completely cooled to room temperature, cover the cheesecake loosely with plastic wrap and refrigerate for at least 6 hours, or preferably overnight. Chilling is crucial for the cheesecake to fully set, firm up, and for the flavors to meld beautifully.
-
Prepare the Ganache Topping (Optional):
- Once the cheesecake is fully chilled, prepare the ganache. In a small saucepan, heat the heavy cream over medium heat until it just begins to simmer around the edges (do not boil).
- Place the finely chopped chocolate in a heatproof bowl. Pour the hot cream over the chocolate. Let it sit undisturbed for 5 minutes to allow the chocolate to melt.
- Add the optional tablespoon of unsalted butter (if using). Whisk gently, starting from the center and working your way out, until the ganache is smooth, glossy, and fully combined.
- Allow the ganache to cool slightly at room temperature for 10-15 minutes, stirring occasionally, until it thickens to a pourable but not runny consistency.
- Pour the ganache evenly over the top of the chilled cheesecake, spreading gently with an offset spatula if needed.
- Return the cheesecake to the refrigerator for at least 30 minutes to allow the ganache to set.
Cooking Tips and Variations
Achieving the perfect cheesecake comes down to a few key techniques. First and foremost, ensure all your dairy ingredients – cream cheese, eggs, and sour cream – are at true room temperature. This is crucial for a smooth, lump-free batter. Cold ingredients will result in a clumpy mixture, no matter how much you beat it. When beating the cream cheese, scrape down the sides of the bowl frequently to ensure everything is evenly incorporated. Secondly, the quality of your chocolate matters immensely. Since chocolate is a star flavor here, use a good quality unsweetened cocoa powder and a semi-sweet or dark chocolate that you enjoy eating on its own. This will significantly impact the depth and richness of your cheesecake.
The water bath might seem intimidating, but it’s your secret weapon against cracks and for achieving that signature silky-smooth texture. It creates a humid environment in the oven, allowing the cheesecake to bake gently and evenly, preventing the edges from cooking too quickly and drying out. Always wrap your springform pan very tightly with heavy-duty foil, ensuring no water can seep in. If water does get in, your crust will be soggy. Don’t rush the cooling process; the gradual cooling in the oven and then at room temperature is just as important as the baking itself to prevent thermal shock and cracks. Finally, patience with chilling is paramount. A fully chilled cheesecake is not only easier to slice but also allows the flavors to fully develop and the texture to firm up properly.
For variations, consider infusing your cheesecake with other romantic flavors. A hint of raspberry extract or a swirl of raspberry puree through the batter before baking would add a lovely fruity counterpoint. You could also add a touch of espresso powder (about 1-2 teaspoons) to the chocolate filling to deepen the chocolate flavor, creating a mocha cheesecake. For a boozy kick, a tablespoon of Kahlua, Grand Marnier, or a raspberry liqueur could be added to the filling. Instead of a plain ganache, try a white chocolate ganache for a beautiful color contrast, or sprinkle with toasted chopped nuts (like pecans or walnuts) for added texture. You can also experiment with different crusts; while chocolate wafers are classic, a crushed pretzel crust could offer a delightful salty-sweet twist.
Storage and Reheating
Cheesecake is an excellent make-ahead dessert, often tasting even better the next day as the flavors have more time to meld. To store your Chocolate Valentine’s Day Cheesecake, ensure it is completely cooled and chilled. Place it in an airtight container or cover it tightly with plastic wrap to prevent it from absorbing odors from the refrigerator and drying out. Stored properly in the refrigerator, the cheesecake will last for 4-5 days. If you’ve added fresh fruit garnishes, it’s best to add those just before serving, as they can sometimes weep or spoil faster than the cheesecake itself.
For longer storage, cheesecake freezes beautifully. If freezing the whole cheesecake, remove it from the springform pan (after it’s fully chilled and set) and wrap it tightly in several layers of plastic wrap, then a layer of aluminum foil. If freezing individual slices, place them on a baking sheet lined with parchment paper and freeze until solid, then wrap each slice individually in plastic wrap and foil. Frozen cheesecake can be stored for up to 1-2 months. To thaw, transfer the wrapped cheesecake or slices to the refrigerator overnight. Avoid thawing at room temperature, as this can cause condensation and affect the texture. Cheesecake is typically served chilled, so reheating is not usually necessary or recommended, as it can alter the creamy texture. Enjoy it straight from the fridge!
Frequently Asked Questions
How do I prevent my cheesecake from cracking?
Cracks are a common cheesecake woe but are largely preventable. The main culprits are overmixing the batter (which incorporates too much air), overbaking (which dries out the cheesecake), and rapid temperature changes. To avoid cracks, ensure your cream cheese and eggs are at room temperature to prevent overmixing. Use a water bath for even, gentle baking. Do not overbake; look for set edges and a slightly jiggly center. Finally, allow the cheesecake to cool gradually in the oven with the door propped open before transferring to a wire rack, and then to the refrigerator.
Can I make this cheesecake without a springform pan?
While a springform pan is highly recommended for easy removal and presentation, you can technically make this cheesecake in a regular 9-inch round cake pan. However, removing it will be more challenging. To do so, line the bottom and sides of the cake pan with parchment paper, leaving an overhang on the sides to create “slings” that you can use to lift the cheesecake out once it’s completely chilled. Be aware that the crust might not be as crisp if you don’t pre-bake it in a regular pan.
Why is my cheesecake filling lumpy?
A lumpy cheesecake filling is almost always due to cold cream cheese. It’s absolutely essential that your cream cheese is softened to true room temperature before you begin mixing. If it’s still cold, it won’t beat into a smooth consistency and will leave small lumps in your final batter. Beat the softened cream cheese by itself for a few minutes until it’s perfectly smooth before adding any other ingredients. If you’re short on time, you can gently microwave unwrapped cream cheese blocks for 15-20 seconds to help soften them, but be careful not to melt them.