Introduction
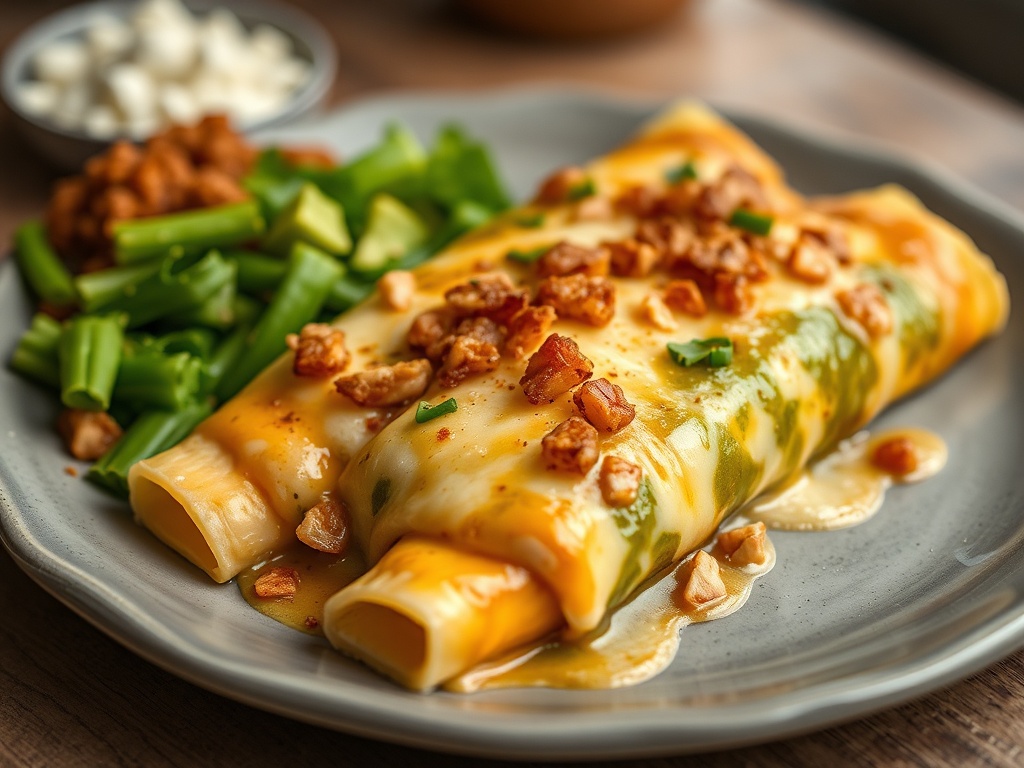
There are few dishes that evoke the same sense of warmth, comfort, and pure culinary delight as a pan of bubbling, cheesy enchiladas. Imagine tender shredded chicken, enveloped in soft tortillas, drenched in a vibrant, earthy green chile sauce, and blanketed with a generous layer of melted cheese. This isn’t just a meal; it’s a celebration of flavors, a hearty embrace for your taste buds, and a guaranteed crowd-pleaser that brings smiles to every table. Our Green Chile, Chicken, and Cheese Enchiladas recipe takes this beloved Mexican classic and makes it accessible, flavorful, and utterly irresistible for your home kitchen.
Enchiladas boast a rich history, with roots stretching back to ancient Mesoamerican cultures where tortillas were dipped in chili sauce. The very word “enchilada” literally means “chili-ed,” a testament to the essential role of chili in its creation. While many variations exist, this recipe shines a spotlight on the distinctive profile of green chiles. Unlike their fiery red counterparts, green chiles, particularly varieties like Hatch or Anaheim, offer a milder, fruitier, and more nuanced heat, creating a bright and incredibly addictive sauce that forms the very soul of this dish. We’re here to guide you through crafting what will undoubtedly become a new family favorite, a dish that’s as simple to prepare as it is profoundly satisfying.
What makes our Green Chile, Chicken, and Cheese Enchiladas truly special is their perfect balance of robust flavor and comforting texture. From the savory chicken to the tangy green chile sauce and the irresistible gooey cheese, every bite is a symphony. Whether you’re a seasoned cook or just starting your culinary journey, this recipe is designed for success. It’s perfect for a cozy weeknight dinner, a festive gathering, or a comforting meal prep solution. Get ready to transform simple ingredients into a masterpiece that will have everyone asking for seconds!
Nutritional Information
Per serving (approximate values):
- Calories: 450
- Protein: 35g
- Carbohydrates: 30g
- Fat: 22g
- Fiber: 4g
- Sodium: 850mg
Ingredients
- 1 tablespoon olive oil
- 1 medium yellow onion, finely chopped
- 3 cloves garlic, minced
- 1 teaspoon ground cumin
- 1/2 teaspoon dried oregano
- 3 cups cooked chicken, shredded (from 1 rotisserie chicken or 2 large chicken breasts)
- 1/2 cup chicken broth
- 1 (15-ounce) can green enchilada sauce (or 2 cups homemade green chile sauce)
- 1 (4-ounce) can diced green chiles, undrained
- 1/4 cup chopped fresh cilantro, plus more for garnish
- 1/2 teaspoon salt
- 1/4 teaspoon black pepper
- 12 corn tortillas (6-inch)
- 2 cups shredded Monterey Jack cheese, divided
- 1 cup shredded Colby Jack cheese, divided
- 1/2 cup vegetable oil, for softening tortillas (optional, for frying method)
- Sour cream, for serving (optional)
- Avocado or guacamole, for serving (optional)
- Lime wedges, for serving (optional)
Instructions
- Preheat your oven to 375°F (190°C). Lightly grease a 9×13 inch baking dish.
- In a large skillet or Dutch oven, heat the olive oil over medium heat. Add the chopped onion and cook until softened and translucent, about 5-7 minutes.
- Add the minced garlic, ground cumin, and dried oregano to the skillet. Cook for another minute until fragrant, stirring constantly.
- Stir in the shredded cooked chicken, chicken broth, diced green chiles (undrained), 1/4 cup chopped cilantro, salt, and black pepper. Cook for 5-7 minutes, allowing the flavors to meld and the broth to be mostly absorbed. Remove from heat and set aside.
- Pour about 1 cup of the green enchilada sauce into the bottom of the prepared baking dish, spreading it evenly.
- Prepare the tortillas:
- Oven/Microwave Method: Wrap 6 tortillas in a damp paper towel and microwave for 30-60 seconds until pliable. Repeat with the remaining tortillas. This is the quickest and least messy method.
- Frying Method (for more flavor and pliability): Heat 1/2 cup vegetable oil in a small skillet over medium heat. Dip each tortilla briefly (about 10-15 seconds per side) into the hot oil until soft and pliable but not crispy. Drain on paper towels. This method helps prevent cracking and adds flavor.
- Assemble the enchiladas: Take one softened tortilla. Spread a thin layer of green enchilada sauce (from the remaining canned sauce) on one side. Spoon about 1/4 cup of the chicken mixture down the center of the tortilla. Sprinkle generously with about 1 tablespoon of the combined Monterey Jack and Colby Jack cheese (use about 1.5 cups of the cheese mixture for the filling, reserving the rest for topping).
- Roll the tortilla tightly and place it seam-side down in the prepared baking dish. Repeat with the remaining tortillas and filling, arranging them snugly in a single layer in the baking dish.
- Pour the remaining green enchilada sauce evenly over the rolled enchiladas, ensuring they are well covered.
- Sprinkle the remaining shredded cheese (about 1.5 cups) over the top of the enchiladas.
- Bake for 20-25 minutes, or until the sauce is bubbling, and the cheese is melted and lightly golden brown.
- Remove from the oven and let rest for 5-10 minutes before serving. This allows the enchiladas to set and makes them easier to serve.
- Garnish with fresh cilantro, a dollop of sour cream, slices of avocado or guacamole, and a squeeze of lime juice, if desired. Serve hot.
Cooking Tips and Variations
For the absolute best flavor, consider making your own green chile sauce. Roasting fresh green chiles like Hatch, Anaheim, or even Poblanos until their skins are blackened, then steaming them in a sealed bag before peeling, creates an incredibly smoky and complex base. If using canned sauce, you can elevate its flavor by simmering it with a pinch of cumin, garlic powder, and a touch of chicken broth. The most crucial tip for enchilada success is to properly soften your tortillas. Whether you briefly fry them in hot oil or quickly microwave them wrapped in a damp paper towel, pliability is key to preventing them from cracking when rolled. Don’t overfill your tortillas; a moderate amount of filling ensures they roll neatly and don’t burst during baking. Always ensure there’s enough sauce to generously cover the enchiladas; this keeps them moist and flavorful. A thin layer of sauce on the bottom of the baking dish also prevents sticking and adds an extra layer of flavor.
This recipe is wonderfully versatile. For a vegetarian twist, swap the chicken for a hearty mix of black beans, roasted sweet potatoes, and sautéed zucchini or corn. You can also experiment with different proteins like succulent pork carnitas or seasoned ground beef for a richer flavor profile. If you crave more heat, finely dice a jalapeño or serrano pepper and add it to the chicken mixture, or stir a pinch of cayenne pepper into your green chile sauce. Explore various cheese blends beyond Monterey Jack and Colby Jack; Queso Fresco can add a fresh, tangy note, while a sharp cheddar can provide a bolder flavor. For a truly decadent experience, make a batch of our homemade cilantro-lime rice or a simple side of refried beans. A crisp, fresh salad with a light vinaigrette also provides a refreshing contrast to the richness of the enchiladas. Remember to taste your sauce and filling before assembling, adjusting salt and spices as needed to suit your preference. Let the enchiladas rest for 5-10 minutes after baking; this allows the cheese to set and makes for cleaner, easier serving.
Storage and Reheating
Green Chile, Chicken, and Cheese Enchiladas are fantastic for meal prepping and storing. To store leftovers, allow the enchiladas to cool completely. Transfer them to an airtight container and refrigerate for up to 3-4 days. For longer storage, enchiladas freeze beautifully. You can freeze them baked or unbaked. If freezing unbaked, assemble the enchiladas in a freezer-safe baking dish, cover tightly with plastic wrap and then aluminum foil, and freeze for up to 3 months. Thaw overnight in the refrigerator before baking as directed, adding an extra 10-15 minutes to the baking time if still partially frozen. If freezing baked enchiladas, cool completely, then wrap individual portions or the entire dish tightly in plastic wrap and foil. Freeze for up to 3 months.
To reheat refrigerated enchiladas, you can either warm individual portions in the microwave for 2-3 minutes or until heated through, or reheat the entire dish in a preheated oven at 350°F (175°C) for 20-30 minutes, covered with foil, until hot and bubbly. If reheating from frozen (baked), bake covered with foil at 350°F (175°C) for 45-60 minutes, then uncover for the last 10-15 minutes to crisp the cheese, until heated through. Adding a splash of chicken broth or extra sauce before reheating can help prevent dryness. Always ensure the internal temperature reaches 165°F (74°C) for safe consumption.
Frequently Asked Questions
Can I use flour tortillas instead of corn tortillas?
While traditional Mexican enchiladas almost exclusively use corn tortillas because they hold up better to the sauce and offer a distinct flavor, you can certainly use flour tortillas for a Tex-Mex style enchilada. Flour tortillas tend to be softer and sometimes a bit chewier, but they will work well. Just be aware they might absorb less sauce and have a different texture. Ensure they are softened before rolling to prevent tearing.
What’s the best way to shred chicken quickly?
The quickest way to get perfectly shredded chicken is to use a rotisserie chicken from your local grocery store. Simply remove the skin and bones, and shred the meat with your hands or two forks. Alternatively, if you’re cooking chicken breasts, you can boil or poach them until cooked through, then use a stand mixer with the paddle attachment on low speed for about 30-60 seconds to shred them effortlessly. This method is incredibly fast and efficient.
Can I make these enchiladas ahead of time?
Absolutely! Enchiladas are an excellent make-ahead meal. You can assemble them completely in the baking dish, cover them tightly with plastic wrap or foil, and refrigerate for up to 24 hours before baking. This allows the flavors to meld even further. When ready to bake, simply remove from the refrigerator about 30 minutes prior to baking, then bake as directed, adding an extra 5-10 minutes to the baking time if needed to ensure they are heated through and bubbly.
What if I can’t find green chiles like Hatch or Anaheim?
If you don’t have access to fresh Hatch or Anaheim chiles for homemade sauce, you can still achieve fantastic results. Look for canned diced green chiles (often labeled “mild” or “medium”) in the international aisle; these are usually Anaheim or similar varieties. For a fresh option, poblano peppers are a great substitute. They offer a mild heat and earthy flavor when roasted and can be used to make a delicious homemade green chile sauce. Your local grocery store might also carry frozen roasted green chiles, which are a convenient and flavorful option.